Objectives
- One point perspective and ants eye view: The students draw the tree in ants eye view keeping perspective in mind. Branches far away are drawn thin whereas the branches that are in the middle of the sheet are drawn fat.
- Printmaking : the students cover the entire tree with prints of cardboard.
Process for the Lesson
The students are given a worksheet, a piece of cardboard and paints. They look at pictures of Rainbow Eucalyptus trees and observe the colours and textures in the bark. They also learn about perspective and understand that the elements near the viewer appear bigger and the elements far away from the viewer appear smaller. They learn in detail about one point perspective and observe the painting that had perspective in it. They also learn about Ants-eye view and start their drawing.
How to be creative:
The students can draw any number of branches and can choose any number of colours for their tree (except black and brown).
What to watch out for:
- Make sure that the triangle drawn is big and covers the whole page. Also instruct the students to draw the triangle light, as it’s just a guideline which will be erased later.
- Remind the students that we are drawing the tree in Ant’s-eye view using one point perspective.
- While drawing the branches, remind them that the branches far away will appear small and thin… But the branches at the middle of the sheet will be bigger as they are closer to the viewers. The size of the branch must be increased gradually.
- The branches can go out of the page too.
- Instruct the students to cut the cardboard as thin and thick strips. Size: A small piece which is comfortable to hold.
- Use one piece of cardboard for each colour to avoid confusion.
- There is no specific place for colours to go … The students can put the colour at any place within the bark of the tree. The colours can overlap too.
TIMELINE
Show the presentation and discuss about perspective (15 minutes )
Drawing (10 minutes)
Outline (5 minutes)
Colouring – print will cardboard (20 minutes)
Colouring – fingerprint leaves ( 10 minutes)
NOW IT’S YOUR TURN
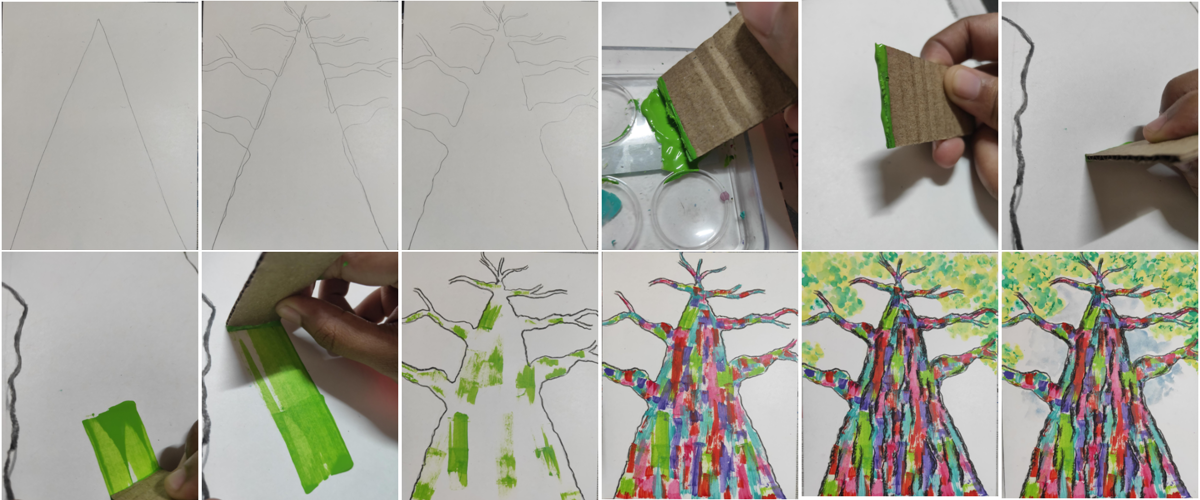
Drawing – Step by step.
- Distribute the worksheets to the students. Ask the students to keep the sheet in portrait. Draw a large triangle. Leave some space at the top of the page. The base of the triangle must not touch the corner of the sheet.
- Draw the branches along the guide lines. The branches at the top of the page must be drawn thin. As you draw the branches below, make it fat each time. The branches can go out of the sheet too. Once the branches and drawn erase the guide lines (triangle lines) .
- Using a black oil pastel, outline the tree. Take the cardboard and cut it into small pieces of varied size.
- Use one cardboard for each colour. Take the first colour ( acrylic or poster paints) on the palette and add some water if needed. Dip the edge of the cardboard in the paint. Place the edge with Paint on the tree and move your hand downwards and then move it upward. Do no take out the cardboard from the sheet before moving it downwards and upwards.
- Repeat this process in places where you want the first colour. Do not cover the entire tree with just one colour… Leave a lot of white spaces when you do the first colour.
- Now repeat the same process for the next next colours. Use a separate cardboard for each colour. Fill in the white spaces with each colour.
- Allow the paints on the bark to dry. With watercolors create fingerprints near the branches for the leaves. First create finger prints of yellow, then using the other fingers create a few prints of light green and dark green. Do this near all the branches of the tree to create the leafey effect.
- Allow the leaves to dry. By this time the bark of the tree would be dry. Using a black oil pastel, create lines inside the bark to cover the white spaces. Then colour a little over the lines and along the outline of the tree.
- Paint the sky in blue water colours only at the top part of the tree. Using a dark green oil pastel, colour small spaces over the leaves to create more depth.
- The Rainbow Eucalyptus tree is complete.