Learning Outcomes
- Learning how characters are made of simple shapes
- Exploring different emotions
- Learning how proportion adds to the character of an object when drawing similar subjects
- To also have a better understanding of accessories adding onto the overall appearance of the character while keeping everything simple
Process for the Lesson
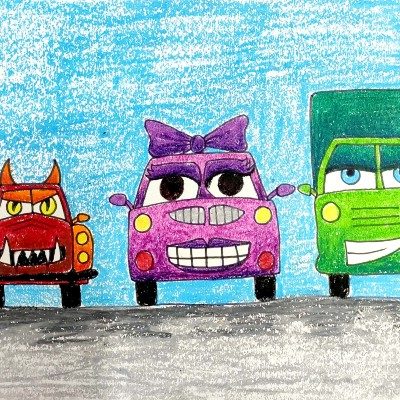
Each student is given a worksheet. They are shown various characters from the movie cars to observe the simple shapes used and the variety achieved by changing proportion. Then the students start drawing their own car characters.
WHAT TO WATCH OUT FOR
Drawing
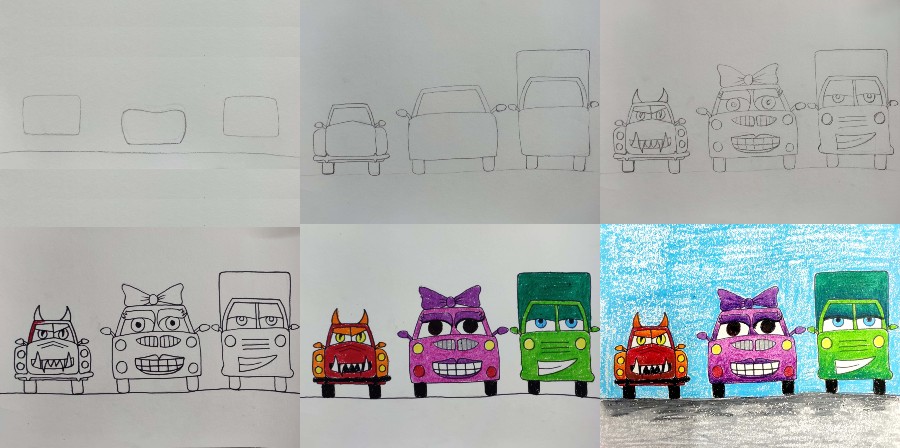
- The space between the road line and cars should just be enough to draw the wheels.
- The wheels are not a full circle as they are viewed from the front. They also have to stay within the shape of the body of the car.
- Keep the height of the cars in check. Even in a truck, the rectangle for the body cannot be very wide or high.
- The accessories/details on the cars have to be drawn big enough to allow oil pastel colouring
- The eye balls can be coloured with sketch pen directly and not with pencil.
- Make sure to draw one car different from the other in size, shape and personality. No cars can be copied from the movie, students have to create their own versions.
Colouring
- Each student has to pick two colours for the body of each character. Shades of these two colours can be used for blending.
- The accessories can to be coloured using different colours. This includes the headlights and mouth.
- The teeth and the area around the eye ball should be left white.
- The colouring should be done in the same direction throughout.
- If the cars are blue, the background can be coloured using yellow
TIMELINE
- Talk about the evolution of story-telling from puppetry to animated movies and charactres in them. Discuss influence of real life animals and objects seen in cartoon characters (5 mins).
- Show students the various characters in ‘Cars’ movie and discuss proportions. Observe the underlying shapes, personalities and use of accessories (5 mins)
- Play the video clip from the movie and ask them to observe the various expressions and personalities (5 mins)
- Draw the body shape of the three cars making sure there is enough space between each car (10 mins)
- Incorporate the wheels and other parts of the car (10 mins)
- Draw the face. Include accessories and details (15 mins)
- Colour the cars (15 mins)
- Colour the background and road (10 mins)
PREPARATION
For the lesson, the teacher will be required to take worksheets, pencils, erasers, black sketch pen and oil pastels
NOW IT’S YOUR TURN
Drawing the illustration- step by step
- Distribute the worksheets. The students start by drawing the road line followed by the shapes for the body of three cars, with a little space between the cars and the road.
- The wheels, mirrors and rest of the body of the car is drawn.
- Facial expressions and accessories along with details are added.
- The drawing is outlined with black pen and the pencil lines are erased.
- Two colours are used to colour the body of the cars. More colours can be used for the accessories/details.
- Finally, the sky and road are coloured.

