Objectives
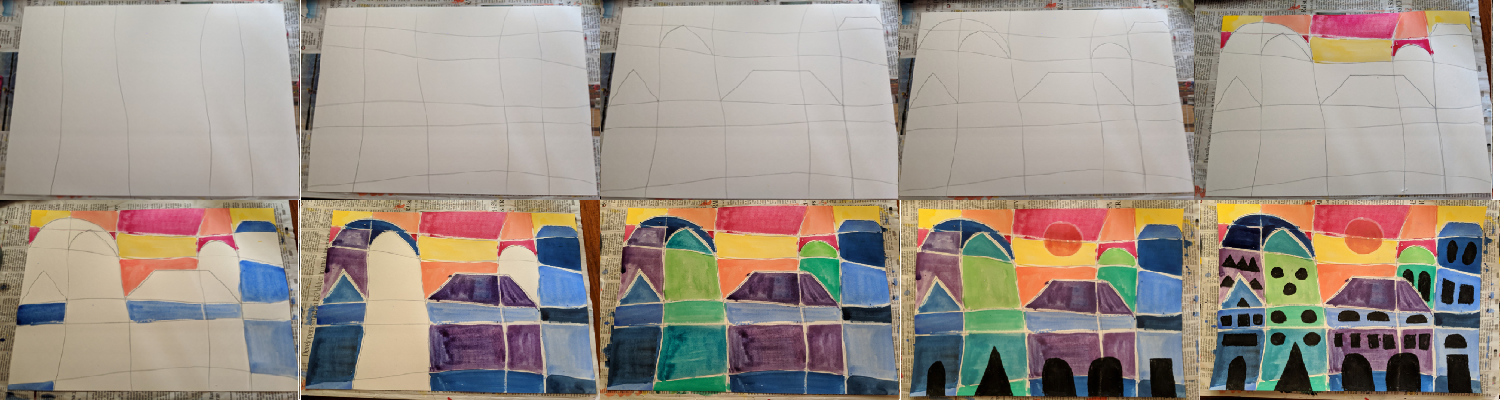
Using simple geometric shapes to compose a cityscape, filled in with warmed cool colours
Artist Reference: Ton Schulten
Artist Reference: Ton Schulten
Process for the Lesson
Step 1: The paper is placed in portrait. Students start by drawing the birds head and unique beak shape in side profile. They can look up references from books/online for the type of head and beak
Step 2: The crest follows next, covering the head but not going out of the paper. Here too, they can research and choose options based on birds crests that are found in real life or even create their own.
Step 3: The birds body is added next. This being the largest part of the drawing, also determines the size of the overall composition to some extent. Space for the legs and feet should be clearly left. The defined feather patterns should be lightly drawn as well.
Step 4: The legs come next. The students can research options for these too based on the functions of the bird’s legs.
Step 5: Students get to choose the colour scheme of their bird too. This one is loosely based on the colours of a macaw. With the colours decided, they fill in their drawing with a light wash of each of the colours. White spaces left between areas is important.
Step 6: Once the first light watercolour wash is dry, a second and third layer is added, with more intense pigment each time. This is a detail shot of what it looks like.
Step 7: This is the overall completed watercolour painting with layers of paint. Different lines within the sections indicate different textures. For example, small strokes within the chest and body. And bigger curved lines within the wing feathers.
Step 8: The final step is using either a black gel pen or black sketch pen to define some areas of the bird.
What to Watch out for
The lines drawn both vertically and horizontally do not have to be perfectly straight. The wavy lines add to the whimsical outcome.
When drawing the shapes for the tops of the buildings, the students should make sure to start and end the shape at the corner points. This will ensure that the buildings appear right next to each other.
The sun/moon is a step that can be done at the drawing stage itself. It can be a full circle if its the sun (warm colour sky) or a full circle, semi circle or crescent to show the moon (cool colour sky). (NOT SHOWN HERE AT THE DRAWING STAGE)
While getting started on the painting, whether warm or cool, it is advisable to work with one colour at a time and fill in random spaces, and then change the colour to the next and so forth. In this way, the student won’t have to keep washing out the brush and changing the paint.
When drawing the doors with black oil pastel, it has to start from the bottom of the paper coloured solid all the way till the edge