Art
Lesson

Search
Generic filters
Search
Generic filters

Art Lesson

ls23thumb

Lino Cut Print inspired by Somnath Hore

Contributed by:

Kiran Nadar Museum of Art

Rubrics:

Art Teaching Techniques

Grade:

Primary School

Medium:

Print Making

Material used:

Coloured Ink, Cutting tools, Linoleum Sheet, Paper, Spoon, Tracing Sheet
ls23thumb

Lino Cut Print inspired by Somnath Hore

Contributed by:

Kiran Nadar Museum of Art

Rubrics:

Art Teaching Techniques

Grade:

Primary School

Medium:

Print Making

Material used:

Coloured Ink, Cutting tools, Linoleum Sheet, Paper, Spoon, Tracing Sheet
ls23thumb

Lino Cut Print inspired by Somnath Hore

Contributed by:

Kiran Nadar Museum of Art

Rubrics:

Art Teaching Techniques

Grade:

Primary School

Medium:

Print Making

Material used:

Coloured Ink, Cutting tools, Linoleum Sheet, Paper, Spoon, Tracing Sheet

Aim

“Lino Cut Print inspired by Somnath Hore” is an opportunity for art lovers to recreate some of the most iconic artworks of the country in their own distinctive style.

Objective

To extend the mission of Kiran Nadar Museum of Art, which seeks to bridge the gap between art and the public.

Learning Outcomes

This black and white artwork is a rich compilation of striking printmaking techniques by the master, Somnath Hore A pioneering effort, this artwork with printmaking techniques is based on KNMA’s outstanding collection. It provides a free rein to the user’s creativity with the option to replicate the artwork itself.

Process for the Lesson

KNMA urges art lovers to throw out the rules, pick up crayons, sketch pens, colored pens, pencil colors or even watercolors to create unique compositions to enjoy and share with family and friends.

– Let’s start, first lay your tracing paper over your design and tape down to secure.

– Now outline your design with pencil.

– Turn the tracing paper over on the Lino sheet so the pencil marks face down.

– Scribble over the traced design to transfer.

– Go over the line using marker to ensure the design doesn’t smudge when cutting the Lino.

– Cut around the edges of your design using smallest V-shape cutting blade. 

– Use wider U-shape cutting blade to cut out the larger areas of white space.

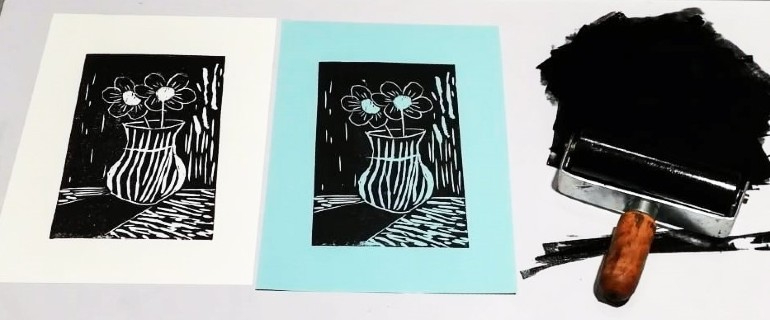
– To ink, take a small amount of ink on flat smooth surface (preferably glass).

– Start rolling with the help of roller/brayer, until u get a smooth velvety texture.

– Roll out onto design layers ensuring all parts of the design are covered.

– Take your paper, and gently place it over your inked Lino sheet.

– Press down using burnishing tool or back of the spoon in circular motions.

– Gently peel your paper and leave it to dry.

– Its ready!!

Contributed by

Related Lessons

Contributed by

Related Lessons

Contributed by

Related Lessons